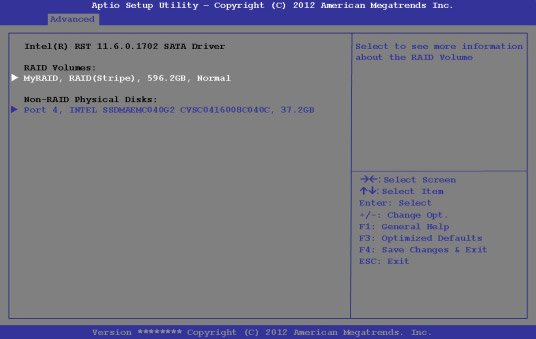
You may use your hard disks in combination with Striping (RAID 0), Mirroring (RAID 1) or Recovery for either fault tolerance or performance.
| RAID Level | Description |
|---|---|
RAID 0(at lease two hard disks / SSDs needed) |
Identical drives reading and writing data in parallel to increase performance. RAID 0 implements a striped disk array and the data is broken into blocks and each block is written to a separate disk drive. |
RAID 1(at lease two hard disks / SSDs needed) |
Identical drives in a mirrored configuration used to protect data. Should a drive that is part of a mirrored array fail, the mirrored drive (which contains identical data) will handle all the data. When a new replacement drive is installed, data to the new drive is rebuilt from the mirrored drive to restore fault tolerance. |
Recovery(at lease two hard disks / SSDs needed) |
Two Identical drives copying data between a master and a recovery disk. This provides more control over how data is copied between the master and recovery drives, fast volume updates and the ability to view the data in Windows Explorer. |
Prepare the following before setting up your serial ATA hard disks in RAID mode:
RAID Setup Procedure
1. Start-up your notebook computer and press <F2> to enter the BIOS.
2. Go to the Boot menu, select UEFI Setting and press <Enter>.
3. Set UEFI Boot to “Enabled”.
4. Press <Esc> to exit the menu and go to the Advanced menu.
5. Select SATA Mode, press <Enter> and select “RAID Mode”.
6. Press <F4> and <Yes> to “Save Changes and Reset”.
7. After the computer restarts press <F2> to enter the BIOS again.
8. Go to Intel(R) Rapid Storage Technology (in the Advanced menu) and press
9. Select Create RAID Volume and press <Enter>.
10. You can now setup your RAID volume using any two installed disks.
11. Go to Name: and press <Enter>.
12. Type a name of your choice for your RAID volume and press <Enter>.

13. Go to RAID Level: and press <Enter>.
14. Choose the RAID Level required (see Table 1 on page 5) and press <Enter>.
• RAID 0 (Stripe)/RAID 1 (Mirror)/Recovery
15. Go to any of the disks listed under Select Disks: and select a disk name and press <Enter>.
16. Move the cursor down (use the arrow keys) onto X (or select the disk required) and press <Enter>. If you have selected a
Recovery level RAID then you need to select one disk to be Master disk (M) and one disk to be the Recovery disk (R).

17. You should select two identical disks to form your RAID volume.
18. If you have selected RAID 0 (Stripe) then you can adjust the “Strip Size” to your requirements.
19. If you have selected Recovery then you can adjust the Synchronization to “On Request” or “Continuous”.
20. Go to Create Volume and press <Enter>.
21. The RAID volume will then be created and the RAID information will be displayed under Intel(R) Rapid Storage Technology
(in the Advanced menu).

22. Press <Esc> to exit the menu.
23. Press <F4> and <Yes> to “Save Changes and Reset”.
24. Make sure the Windows 8.1 OS DVD is in the attached DVD drive and as the computer starts up it will automatically boot from
the Windows 8.1 OS DVD (you will be prompted to press a key to boot from the DVD).
25. Press <F7> as the computer starts up to bring up the boot device menu.
26. Select the DVD drive containing the Windows 8.1 OS DVD and press <Enter>.
27. Press a key at system startup to begin installing Windows from your Windows 8.1 OS DVD.
28. Click Next > Install Now to continue installing the operating system as normal (see your Windows documentation if you
need help on installing the Windows OS).
29. Follow the on-screen instructions to install the Windows 8.1 operating system.
30. Install the Windows drivers as per Table 4 on page 25. Make sure you install the Intel® Rapid Storage Technology (IRST)
driver (see page 30).